OpenSportz Help
Index
General
Introduction
General
Hardware and Software
Site Configuration
Server Installation
Kiosk Installation
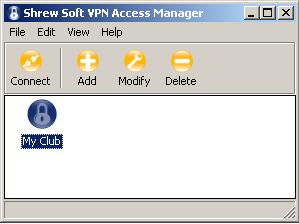
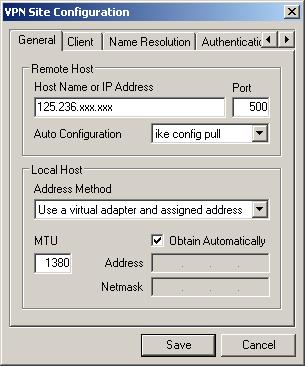
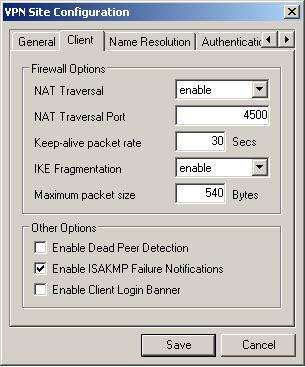
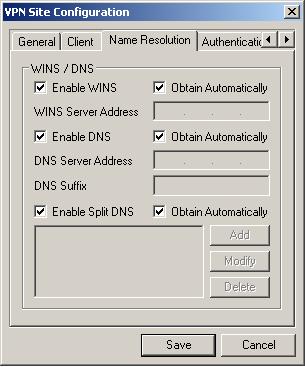
IPSEC VPN Setup
Database
Accounts
Account History
Bank Statement Import
Bookings
Door Control
Lights On / Off
User Details
Card Details
Door Access Info
New Bookings
User Group Charges
Zero Account Balances
Special Card Types
Contact List
Reports
Court Usage
Door Access
Financial Report
Transaction Report
Trial Balance Report
Incorrect Balance Report
Invoicing
User Group Report
User Details Report
Setup
Account Types
Address Types
Court Hire Rates
Contact Types
Court Setup
Device Setup
Device Firmware Upgrade
Group Flag Types
Kiosk Information
User Group Types
Note Types
Play/Access Time Setup
Sport Setup
Transaction Types
Maintenance
Audit Log
Backup
Import Data
System Status
Server Status
OpenSportz Status
|
What is OpenSportz ? |
top |
|
OpenSportz is an open source sports facility managment system designed to make the daily operation of the facility easier. OpenSportz curently provides the following features:
By using OpenSportz, your facility will increase security, reduce fraud and theft, and free up your committee/volunteers to promote your sport/club rather than being tied down in daily administration. | |
|
Hardware and Software Requirements |
top |
|
OpenSportz is currently being developed on the following platform:
That said, pretty much any computer capable of running Linux with MySQL (v3.x, 4.x or 5.x) and PHP (v4.x or 5.x) should work with the possibility of some minor language compatibility issues. | |
|
openSUSE Server Installation |
top |
|
Here's a typical server setup for running Hardware. Here's our typical (high end) server hardware spec.
OpenSUSE 10.3. Boot from the openSUSE 10.3 CDROM and choose Install. Then choose New Installation. Follow the default options until you get to Partitioning, Software Packages and Boot Loader options. See below for what to do next. Partitioning the hard drives. We will use RAID1 (Mirrored) drives, so setup the 2x 250GB drives as 248GB (mount point /) with type Linux RAID (0xFD) and 2GB for Linux swap (not mirrored). Note that the swap partition must not be the first partition on the disk. Setup the 2x 1TB drives as Linux RAID for the entire drive (mount point /srv/www/htdocs/zm). Next create the RAID partitions, set our 248GB / partition as type EXT3 and the 1TB /srv/www/htdocs/zm partition as type XFS. Boot Loader. Since we are using RAID1 and only a single OS we need to install the Boot Loader (Grub) into the Master Boot Record (otherwise the install tries to put it on one of the raid partitions and you wont be able to boot). So ensure you check "Boot from Master Boot Record" and uncheck "Custom Boot Record", then under Boot Loader Options check "Write Generic Boot Code to MBR". Software Packages. Select the following additional software package groups: File Server, Web Server, C++ Development, Kernel Sources. Reboot the server now and finished the standard install questions (root password, release notes, etc. OS Update. Using Yast select the following online community repositories: OpenSUSE update, NVIDIA and packman. Now perform a software update to get all the lates OS patches and kernel updates. This will take some time. NVidia Driver. Assuming you have installed an NVidia graphics card you should install the NVidia driver matching your card, typically x11-video-nvidiaG01. Run "sax2 -r" for X.Org configuration. ZoneMinder software requirements. See this link for additional software required before installing ZoneMinder. My experience has shown it is better to compile ffmpeg from source otherwise the ZoneMinder configure step fails to find the required libraries (see ffmpeg download) (Note, ZoneMinder build fine using the ffmpeg from rpm or yast on openSuse 11.2 and 11.4). Once installed you need to manually copy the boot script from scripts/zm to /etc/init.d/zm, then edit it to remove the 'functions' include and change 'success' to 'echo success' and 'failure' to 'echo failure'. Also create the following symbolic links:
Here is a typical ZoneMinder configure command: ./configure --with-webdir=/srv/www/htdocs/zm --with-cgidir=/srv/www/cgi-bin --with-webuser=wwwrun --with-webgroup=www ZM_SSL_LIB=openssl ZM_DB_PASS=xxxxxx. If you need to install additional perl modules you can use the following command as root perl -MCPAN -e 'install foo::blah' Kernel Shared Memory. ZoneMinder makes use of a lot of shared memory so we must adjust the kernel shmall and shmmax parameters in the /etc/sysctl file. Set 'kernel.shmmall=2048000' (this means a max of 2048000 pages of shared memory, or 8GB) and 'kernel.shmmax=4194304000' (this means a max of 4GBytes of shared memory per request). The OpenSportz osz-ethernet.php script can check the status of the ZoneMinder database if you issue the following mysql grant command: grant all on zm.* to openuser@'localhost' identified by '*******', where 'openuser' and the '******' password comes from your site_config.php file. If the ZoneMinder database is found to be corrupted an auto-repair will be attempted and an email will be sent to the SECURITY_EMAIL_ADDRESS in the site_config.php file. OpenSportz software requirements. Using the Yast Software Update install the following php5 modules: php5-bz2, php5-gd, php5-mysql, php5-pcntl, php5-sockets and php5-zlib. The Apache web server and MySQL database will have already been installed during the base install. NUT UPS software. If you are using a UPS (and you should be !) install NUT. Example NUT configuration files are included in the OpenSportz scripts directory (/srv/www/htdocs/opensportz/scripts). | |
|
Checking your RAID disk status: Check your raid disks are ok by using the mdadm command as root: mdadm --misc --detail /dev/md0 | |
|
Securing SSH for remote access. SSH is a secure shell protocol which can make remote access and configuration of your server easy. But you must take care to make ssh secure, so here are the first few steps:
Remote Administration. Command line remote administration is easliy done using SSH after you have preloaded your public keys as described above. You can even run remote GUI applications if your client machine is running an X Server. Simply run 'ssh -X opensportz@myclub.co.nz' to enable the X extensions and forward the GUI to your desktop. If you get the error message 'Cannot connect to X server' then check the following settings on the server:
| |
|
How to clone a hard drive. If you want to copy the Kiosk PC hard drive to make another bookings kiosk here is a simple procedure to clone the hard drive. This procedure works even if the hard drives are different sizes.
| |
|
openSUSE Kiosk Installation |
top |
|
Here's a typical kiosk setup for running Hardware. Here's our typical kiosk hardware spec.
| |
|
Software.
| |
|
IPSEC VPN Setup |
top |
|
Install the novell-ipsec-tools package from 'Yast - Software Management'. This installs the racoon daemon and associated tools. Set the racoon daemon to run at boot time from 'Yast - System Services (Runlevel)'. The racoon configuration files are in /etc/racoon and certificate files are in /etc/ssl. An example racoon.conf file is included with OpenSportz in 'scripts/racoon.conf.sample'. Make some changes to the openssl setup so we can generate certificates (you need to be logged in as 'root' for all the openssl and racoon commands):
Creating the certificate files with openssl:
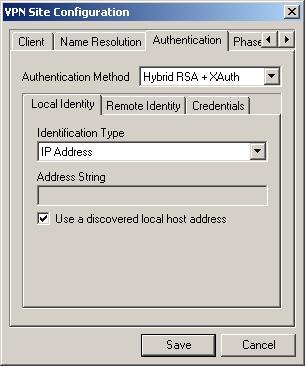
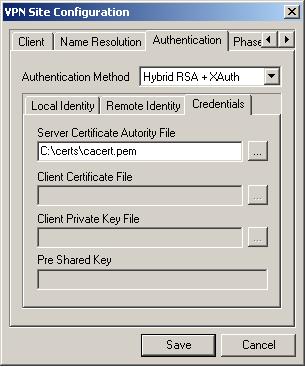
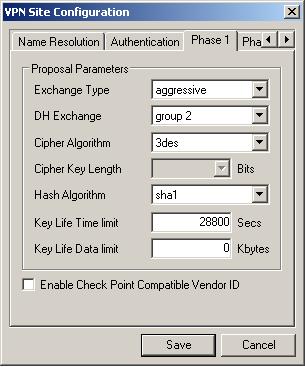
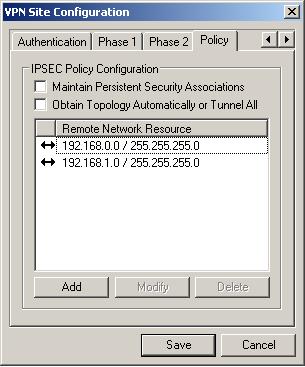
Restart the racoon daemon by 'rcracoon restart'. Configure the openSUSE firewall to allow IPSEC. Configure your ADSL modem to allow IPSEC pass through, you may also need to specifically allow UDP on ports 500 and 4500 and TCP on port 50 to the server. Client VPN setup. Use Shrewsoft's VPN client - it works on Windows XP and Linux clients and it's free. Download it from www.shrewsoft.com. Use a USB key to transfer the cacert.pem file created above - do NOT email the cacert.pem file about for security reasons. Setup your VPN clients as follows: | |
|
General |
top |
|
Automatic Logout. After 5 minutes of inactivity you will be automatically returned to the home page of the portal and any changes will not be saved. This is to ensure someone does not lock out another user. The timeout period is configurable. The automatic logout does not apply, however, if you are entering details of a new player or a new receipt. Securlty Levels. The following security access levels are used to restrict users from accessing certain database information.
| |
|
Site Configuration |
top |
|
The site_config.php file is where you personalise OpenSportz to your particular club. A sample config file is provided as site_config_sample.php for you to copy and edit when you first install OpenSportz. When you upgrade OpenSportz your site_config.php file will remain unchanged with any new settings appearing in site_config_sample.php. You must manually add any new settings into your site_config.php file. The following settings are contained in the site_config.php file:
| |
|
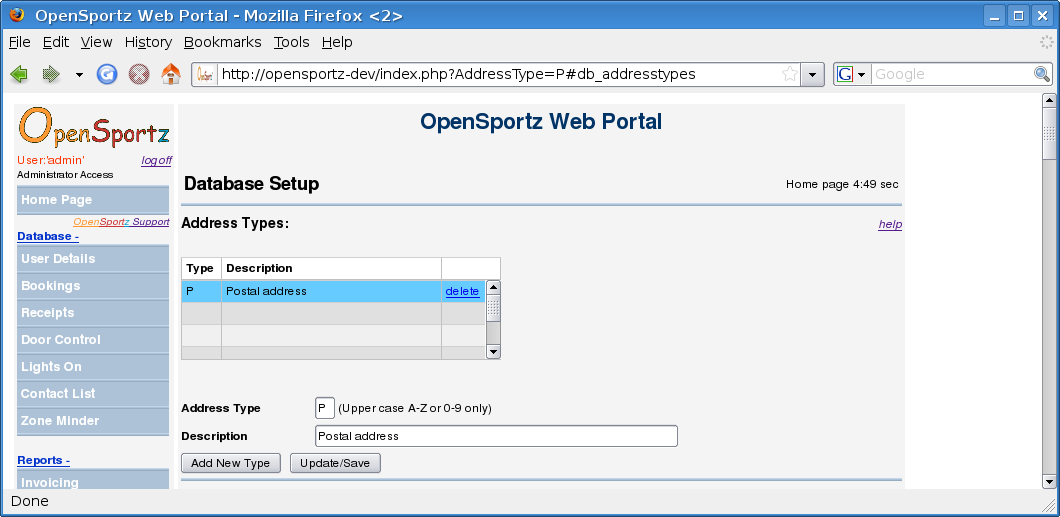
Address Types |
top |
|
Address Types allow you to record different types of address records for each user if required. For example, you may need to record a postal address and a separate physical address. Each address record can have up to 4 lines and each line can be up to 30 charachers in length. The following address types are setup by default:
| |
|
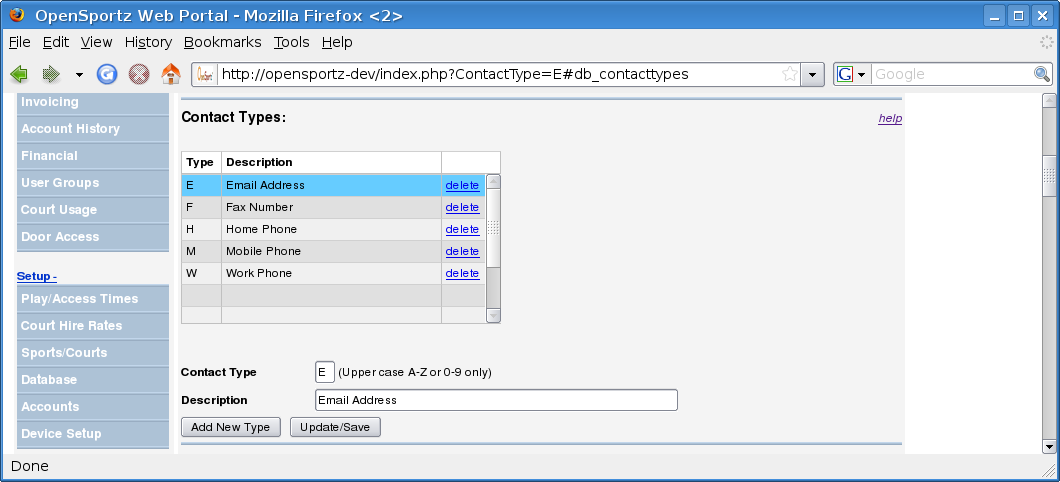
Contact Types |
top |
|
Contact Types are a way of recording different ways of contacting your players, such as home and work telephone, email contact details, etc. The following contact types are setup by default:
You can add your own categories, for example, home email and work email or different telephone numbers. Each contact record can be up to 60 characters in length and you can also choose whether the information should be visible to other users on the Contact List. If multiple email addresses are loaded for an individual then any automated emails (e.g. new user registration, invoices, receipt confirmation, etc) will be sent to all email addresses. | |
|
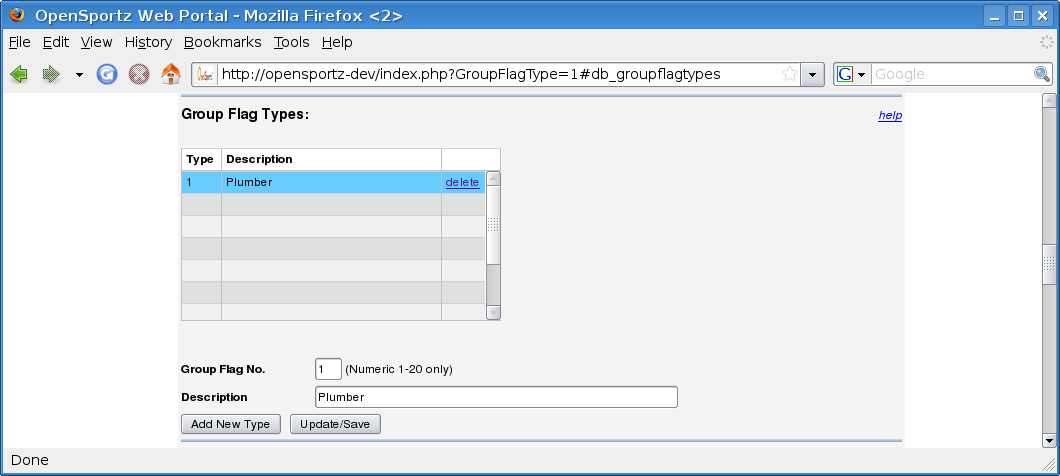
Contact Types |
top |
|
Group Flags are a way of grouping your players, for example, Juniors, Masters, Committee members, etc. The group flag type can be up to 10 characters and its description up to 100 characters in length. Each users group flag records are marked with a single character marking their inclusion in that pariticular group, e.g. Y or N. | |
|
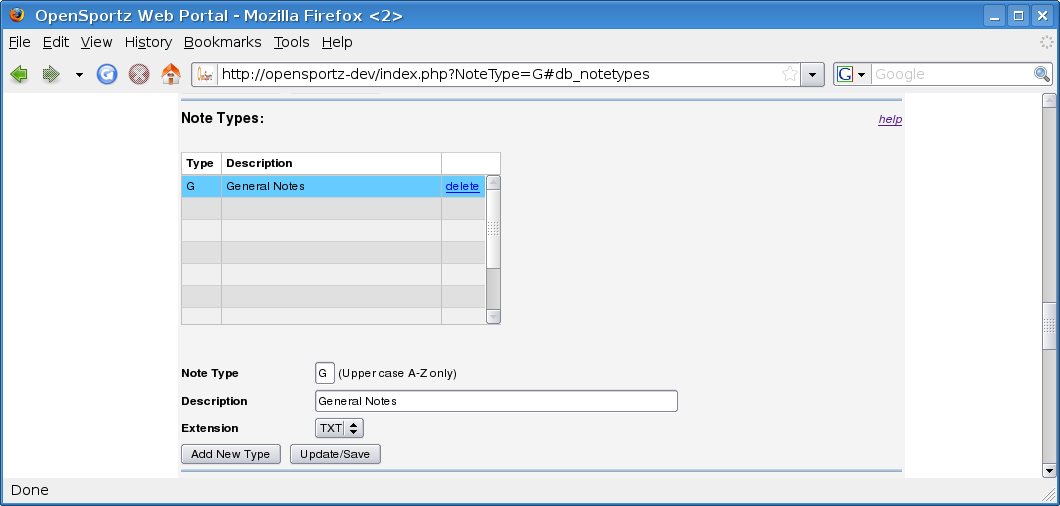
Note Types |
top |
|
Note types allow you to record general information about each user. Your can add your own note categories, such as general, interclub, volunteer skills, etc. The note type is a single character (A-Z, 0-9) and the description is up to 100 characters in length. The extension is for future use, currently only text (TXT) fields are supported. | |
|
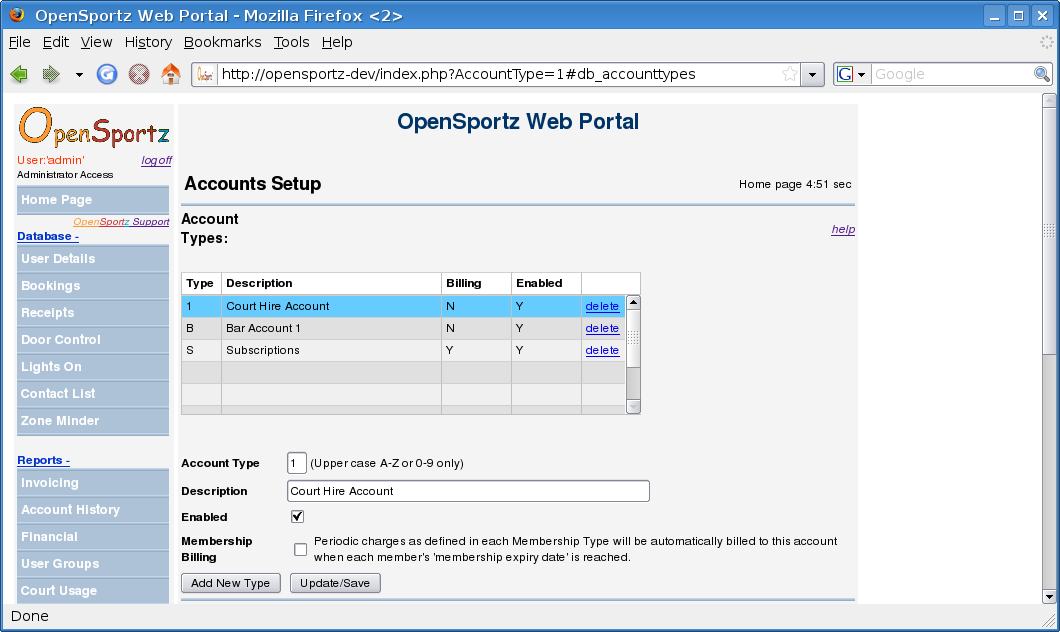
Account Types |
top |
|
You can setup one or more Account Types where each Account Type is treated as a separate "bank account" for each user. The Account Type is a single character (A-Z, 0-9) and the Description can be up to 100 characters in length. For example, you might have a "Court Hire" account for all court hire transactions, and a separate "Membership" account for tracking the players affiliation or joining fees. If required each account type can be hidden from the users details and reports pages by unchecking the Enabled box. If you want to enable automatic user group billing of subscriptions or other periodic amounts you must select one of your account types, e.g. the 'Subscriptions' account, to be used for User Group Billing by checking the 'User Group Billing' checkbox. This will cause all user accounts to be checked each night for an expired group and then debit their account with the amount defined for that user group type. | |
|
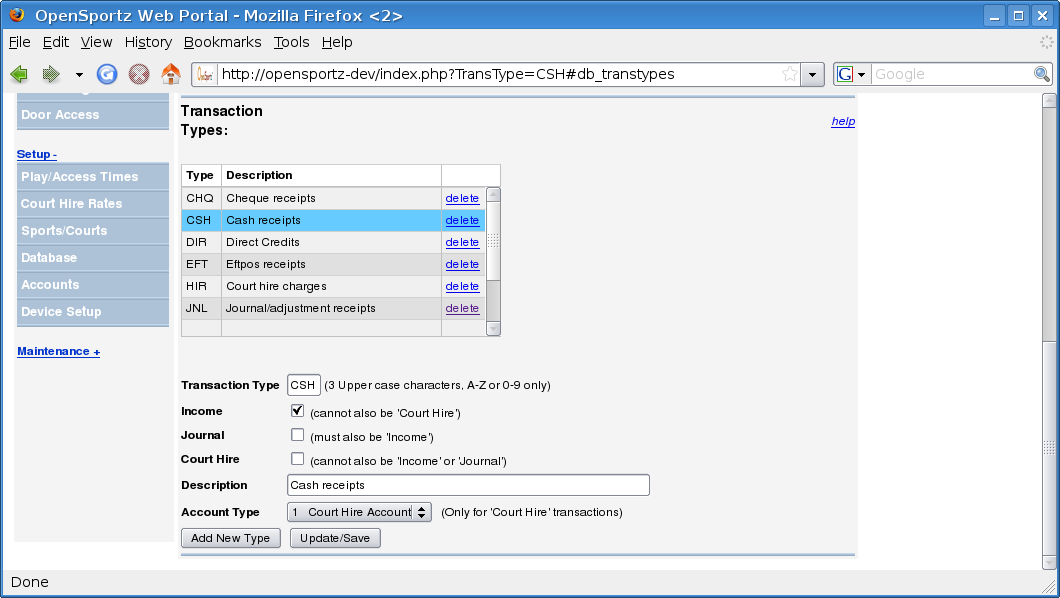
Transaction Types |
top |
|
Transaction Types are used to ensure the financial records of court hire, shuttles, balls, racket hire, etc are kept in separate categories for ease of financial reporting. The 'Transaction Type' is a 3 character code and its description can be up to 100 characters in length. The following transaction types are setup by default:
| |
|
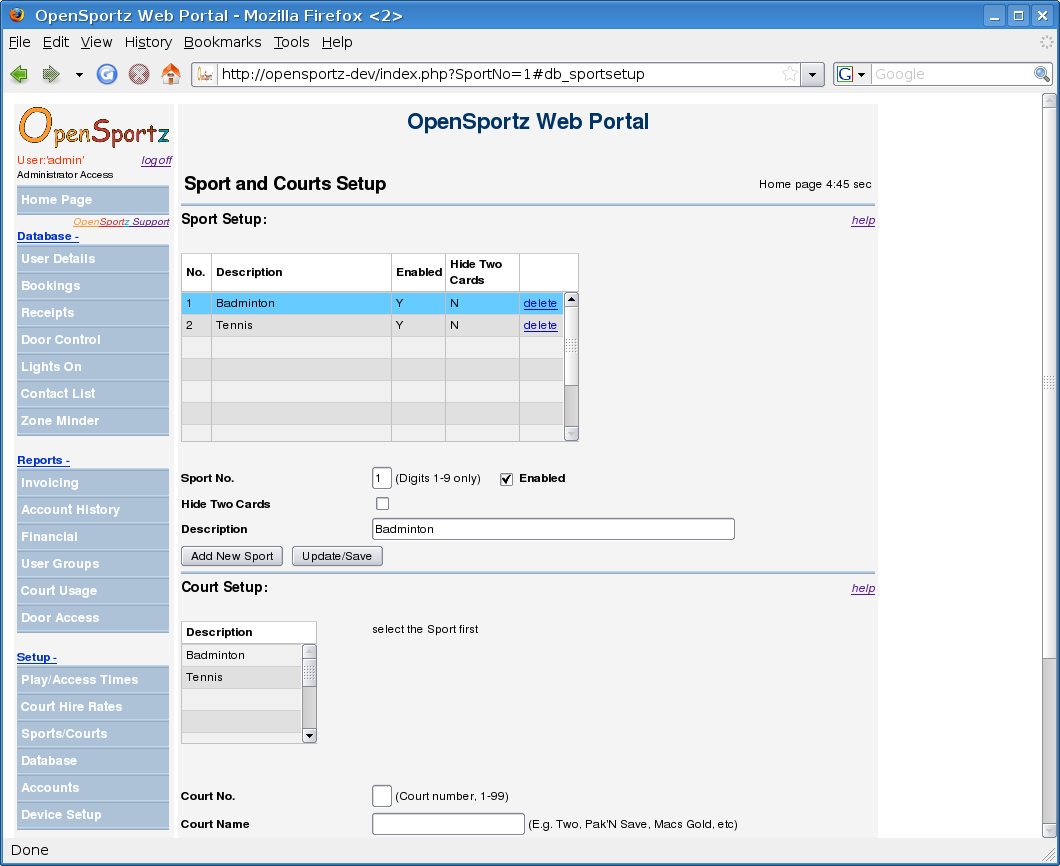
Sport Setup |
top |
|
This screen allows you to setup the name of the sport(s) played at your facility. Multi sport facilities are also supported. If your facility has courts for the same sport which should be handled separately, such as indoor tennis and outdoor tennis courts, you can record these as different sports, for example naming them 'Indoor Tennis' and 'Outdoor Tennis'. If a particular sport does not use the 'two cards' option for turning on court lights then you can hide these fields from the members and bookings pages. Within each sport you can also record details of each court, such as its name or number, refer to the section on Court Setup for more information. | |
|
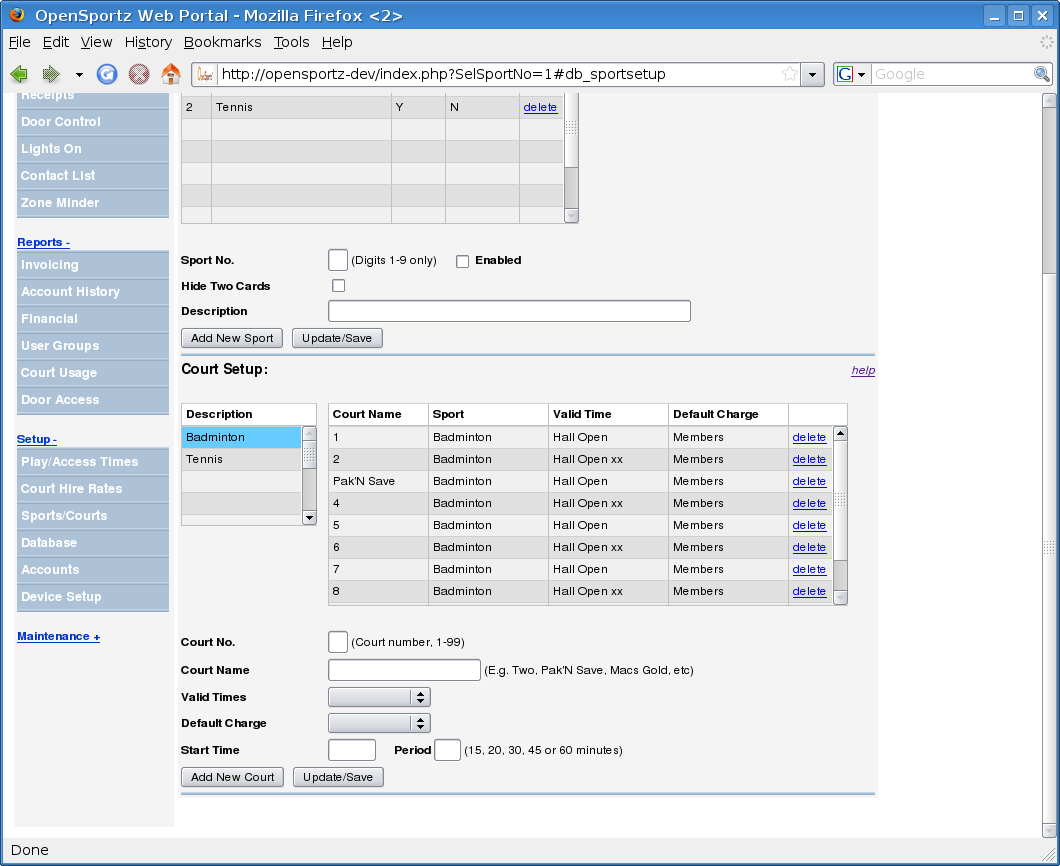
Court Setup |
top |
|
This screen allows you to record details of each court at your facility:
| |
|
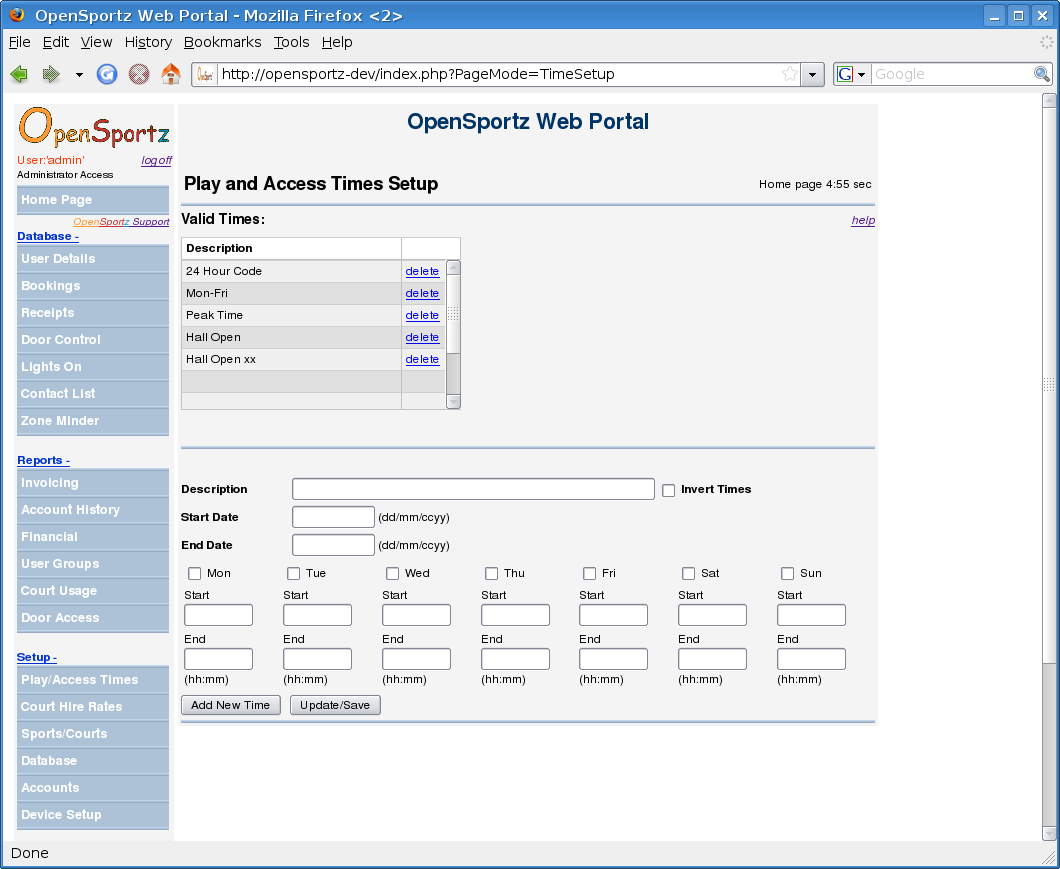
Play/Access Time Setup |
top |
|
The Play/Access Times (or Valid Times) screen allows you to define time periods during the day (and days of the week) which can then be linked to door access times or playing times. For example, committe members or your security monitoring company need 24 hour access to the facility, so you link their door access to a "24 hour" Valid Time record. Normal users are only allowed to enter the facility from 6:00am to 11:30pm, so their door access is linked to this record. Similarly, for playing times, you can define when all users or certain groups of users can turn on the court lights. For court hire charging, the Valid Time records can be used to charge different amounts, e.g. to charge more during 'peak time'. | |
|
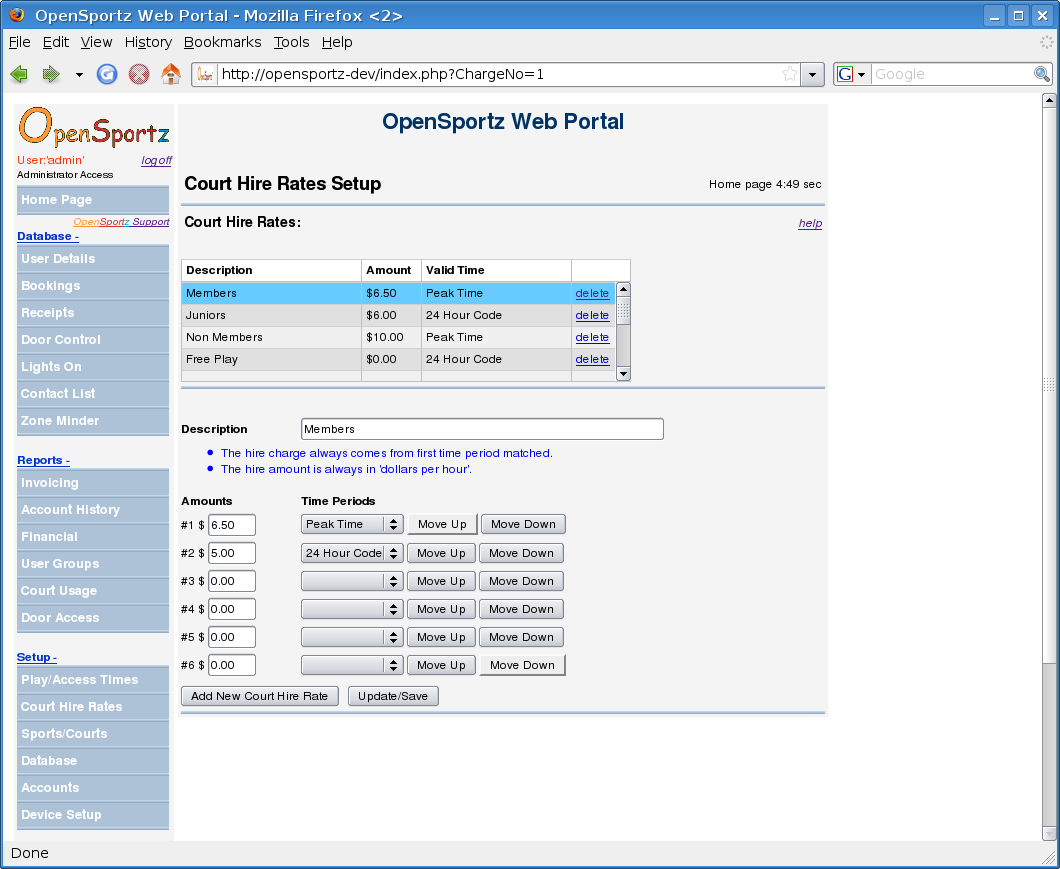
Court Hire Rates |
top |
|
This screen allows you to setup different court hire rates. You may have a simple scheme where all players are charged the same amount, or multiple hire rates, e.g. $4.00 for Juniors, $6.00 for Adults, $10.00 for non 'members', etc. You can make the hire rates as simple or as complex as you like to suit your facility. All rates are specified in a dollar amount per hour. If your court periods are not in even hour periods you must calculate the appropriate hourly charge, e.g. if you charge $4.50 per 45 minutes, your hourly rate is $6.00. On the user details page you can specify 2 court hire rates. One for the first court used and a separate rate if multiple courts are used at the same time (obviously to make use of the second rate the user must have the 'Multi Court' option also). The lowest numbered court will always be at the 'single' court hire rate regardless of the order the bookings were made. Each court hire rate can have an option 'No Show Fee' set which will be charged to the player if they do not turn up to use their booking and the booking is automatically cancelled by the system after the 10 minute waiting period. Note that if the player has multiple courts booked and does not show up, then the no show fee charged will be the fee for the single court hire rate for all courts, not the fee for the multi court hire rate. | |
|
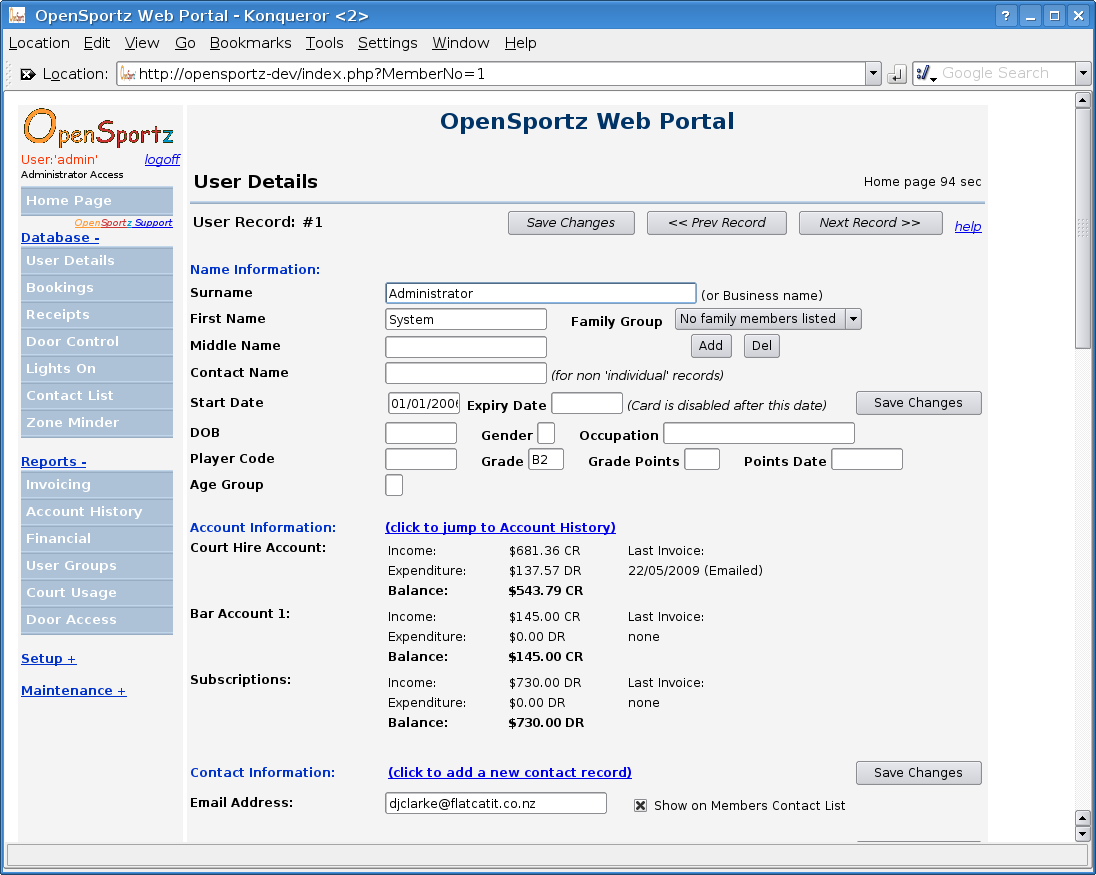
User Details |
top |
|
Selecting Users. This screen displays a list of users in alphabetical or card number
order. To select a user from the list, simply click the mouse on their name. To search for a user, enter the first few letters of their name then click the search button. There are also alphabetical 'quick search' links to jump to a part of the alphabet. User Details Once you have selected an individual user, you can then view or edit
their details, including name, address, contact information, and account details. Simply click the save button to
record your changes in the database. For individual players you should record their name using the surname, firstname and middlename fields. For group or business records you should record the group/business name in the surname field and the contact person in the contact field. After you change the users details you must click one of the Save buttons on the right hand side of the page to save all changes. Any Save button will do, they all do the same thing, multiple buttons are displayed so you don't have to scroll the page up and down. The following fields on the users details page have special features:
You cannot setup a login username and password for a user until their email address has been recorded in the database. Once the email address is recorded you can enter their login username and password which will be automatically emailed to the user when you save these details. If the password is lost or compromised you must create a new password as the actual password is not held in the database, only its SHA1 hash value. For security, whenever a user login attempt fails an email will be sent to the SECURITY_EMAIL_ADDRESS defined in your site_config.php file. You can link family groups together by choosing who will be the primary group member and then selecting the other members of the group. As an option you can specify that the primary group member will pay the court hire for the other members of the group by checking the 'Pays for family members' box on the member details page. Each card within the group operates independently just like any other card, but if a group member runs out of money funds for court hire funds can be automatically transferred from the primary member. Securlty Levels. The following security access levels are used to restrict users from accessing certain database information.
| |
|
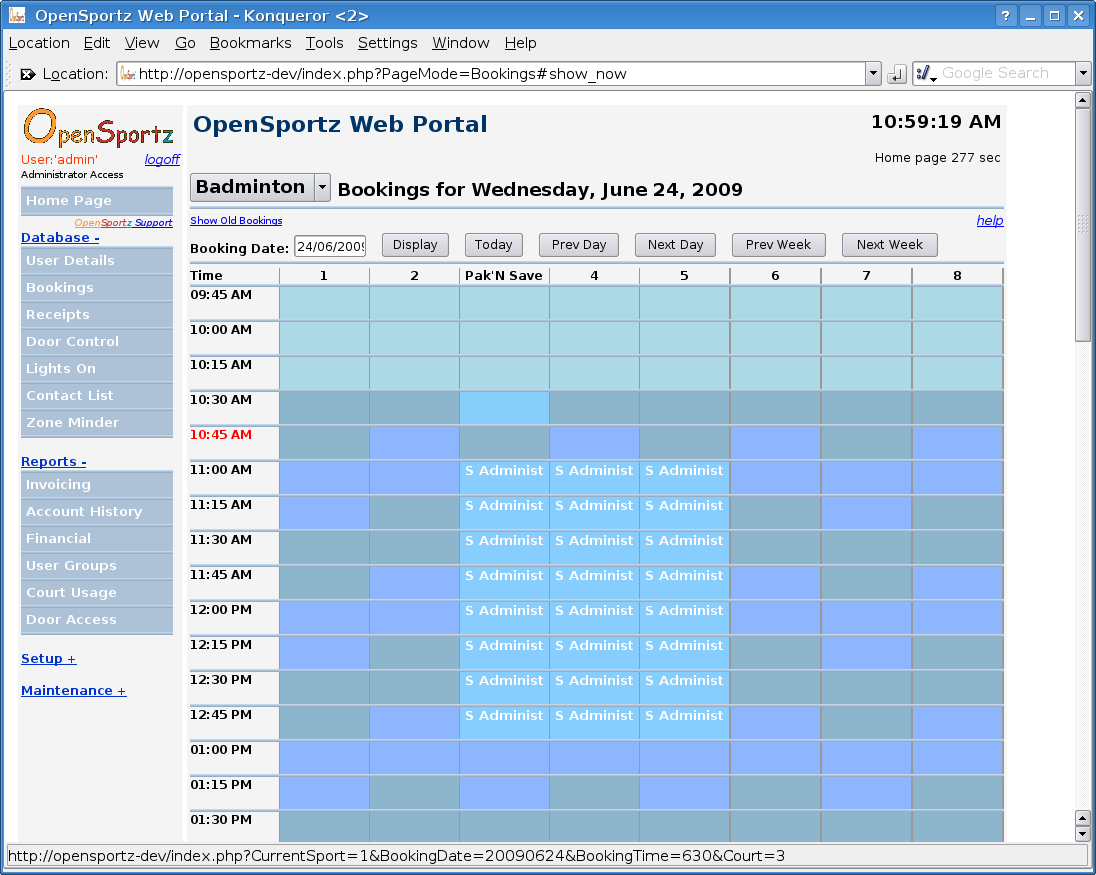
Bookings |
top |
|
This screen shows the court bookings for the selected date and sport. By clicking on a blank court time slot you can select the player then create a new booking. If you click on an existing booking the booking details will be displayed. If the booking has not yet started you can alter any of the booking details. If the booking has already started you can only alter the booking end time. If a player arrives early, they can swipe their card up to 10 minutes (configurable via the site_config.php file) before their booking time to set the lights to come on automatically when the booking time is reached. If a player turns up late for their booking, the booking will only be held for 10 minutes (configurable via the site_config.php file) after which it will be cancelled. Long term bookings vs one off bookings. The best way to enter bookings for a "long term" booking (club nights) vs one off events (tournaments) is the following order:
The other situation you will encounter is when there is already a one off booking in the future which clashes with the long term booking you are trying to enter. In this case you have 2 choices:
| |
|
New Bookings |
top |
|
The new booking details are displayed here, including the start time, duration and cost of the booking. If the booking has not yet started you can alter any of the booking details. If the booking has started you can only alter the booking end time or turn the lights off immediately. If the player is set to require two separate cards to turn the lights on they can also choose to play with a visitor or a solo practice session - if they have visitor or practice sessions alailable on their card settings. If the lights are turned on with two cards each player will pay half the standard court hire charge. If the player turns the lights on with the visitor option they will pay half the standard court hire charge plus any optional visitor charge loaded against ther card settings. If the player turns the lights on with the practice option they will pay half the standard court hire charge plus any optional practice charge loaded against ther card settings. | |
|
Accounts |
top |
|
This is where you record money received from the player to put against their account, which they can then use for purchases such as court hire, racket stringing, etc. You can also deduct money from a players account using this same screen, for example, for an annual facility usage fee or interclub fees. The following fields can be entered when adding a accounts record:
|
|
|
Accounts - User Group Charges |
top |
|
User Group Charges allow you to rapidly add charges (or credits) to all users in the selected user group. This feature is useful, for example, when billing annual charges - $10.00 to each affiliated member and $20.00 to each non affiliated member. Or crediting the court hire account with $20.00 for each division team member as sponsorship. For flexibility, you also have the option of selecting 2 different user groups and to decide whether to include or exclude these types of users. For example, you can bill all affiliated members who are not also committee members. If you define a user group amount and period (1, 2, 3, 4 or 6 months or Y yearly) then any user assigned this user group will be automatically billed the amount specified here when their group expiry date is reached. |
|
|
Change User Groups |
top |
|
The Change User Groups page allows you to change user group membership for all players to make end of year rollover much easier. You can also clear the expiry date and comment when making the user group change. Optionally you can delete the selected user group from all users. You can also change the court hire rates (both single and multi court rates) from this page also. To leave the hire rates unchanged, simply leave the sport selection blank. |
|
|
Accounts - Zero Acocunt Balances |
top |
|
The Zero Account Balances feature allows you to easily reset all player balances for the selected account type to zero. You may wish to do this at the start of each financial year for example. Normally this feature would be used by facilities who have transferred user and account information from another software package are are wanting to start the new accounts from a zero balance. |
|
|
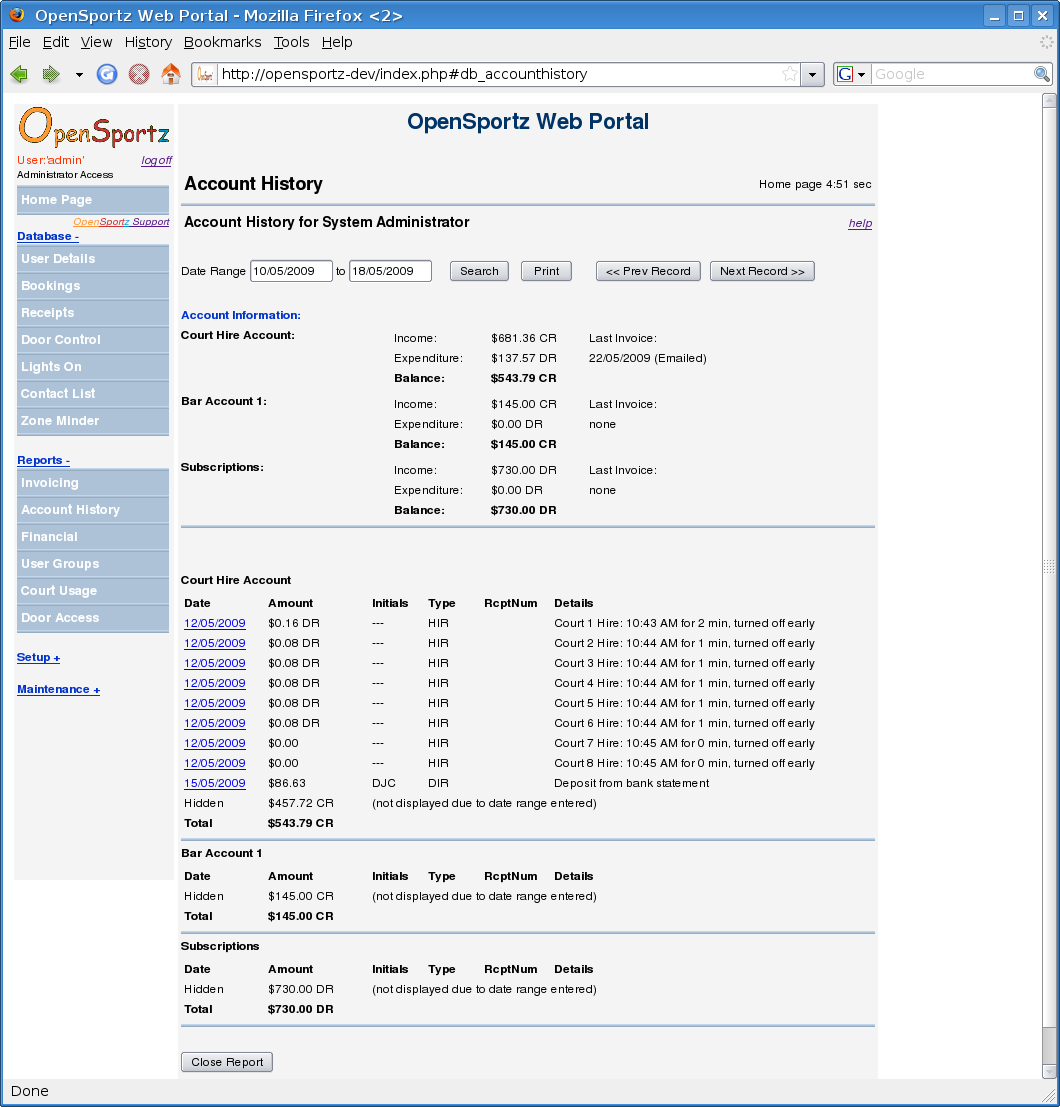
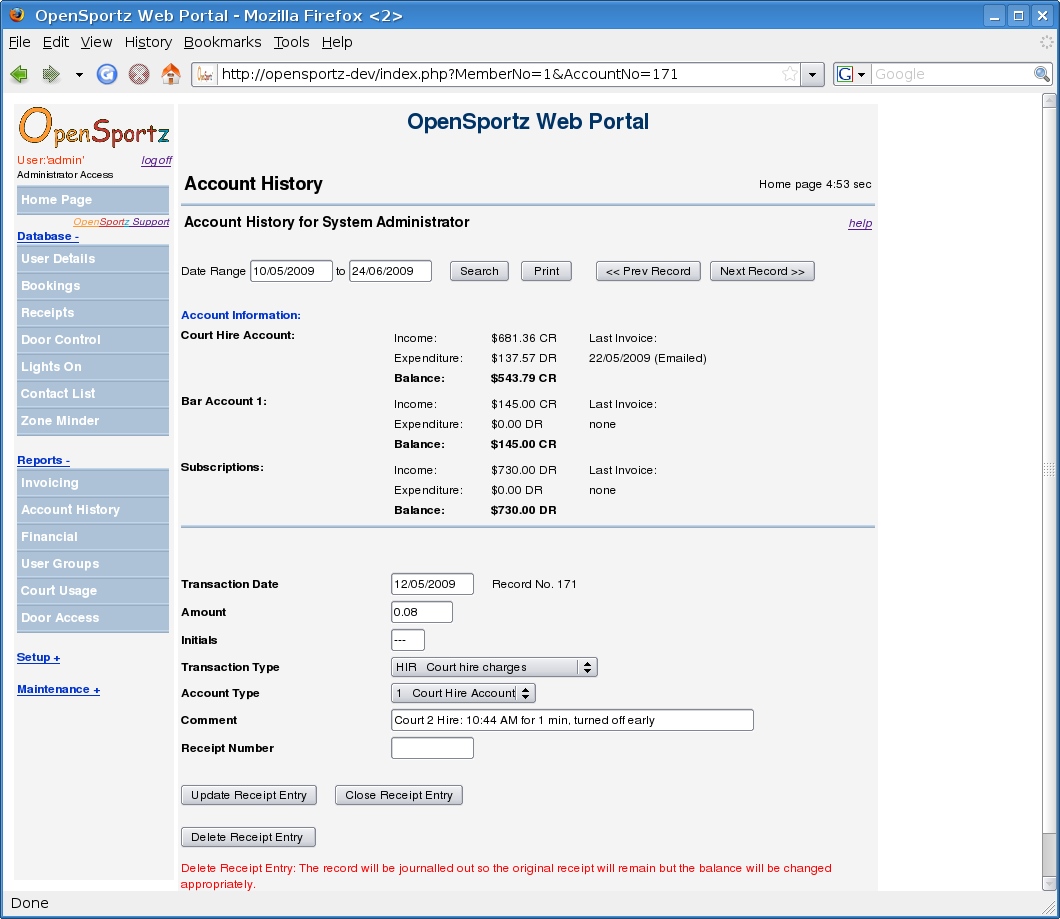
Account History |
top |
|
The account history page show a list of all financial transactions for the selected user for the date period entered.
If you have been allocated 'Accounts' security level you can click on the transaction date which will allow you to edit the transaction.
Deleting Receipts Depending on the site_config settings you can use one of two ways to delete a receipt record:
|
|
|
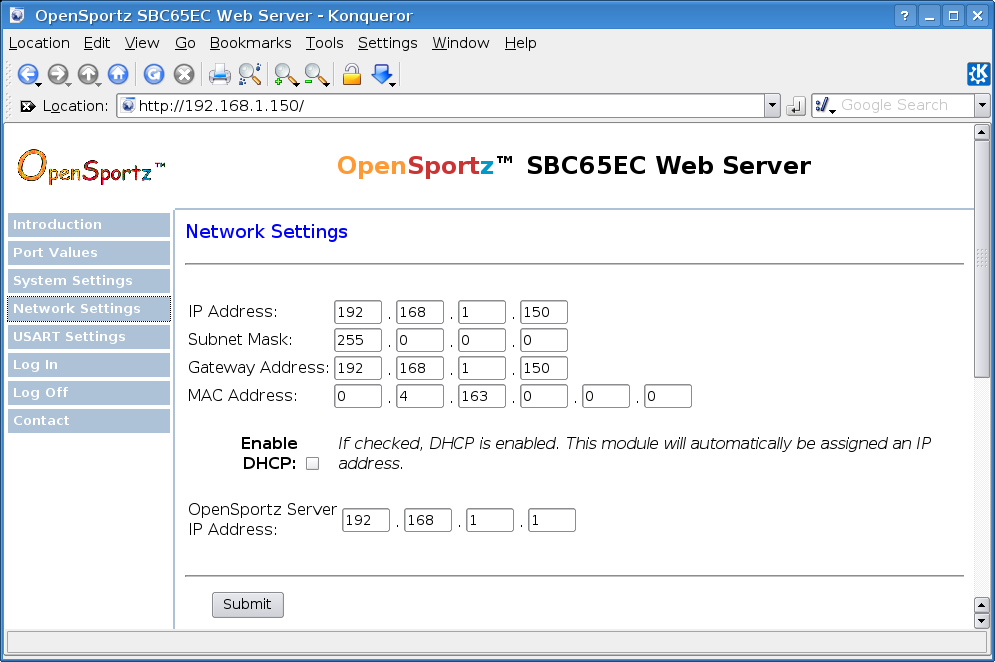
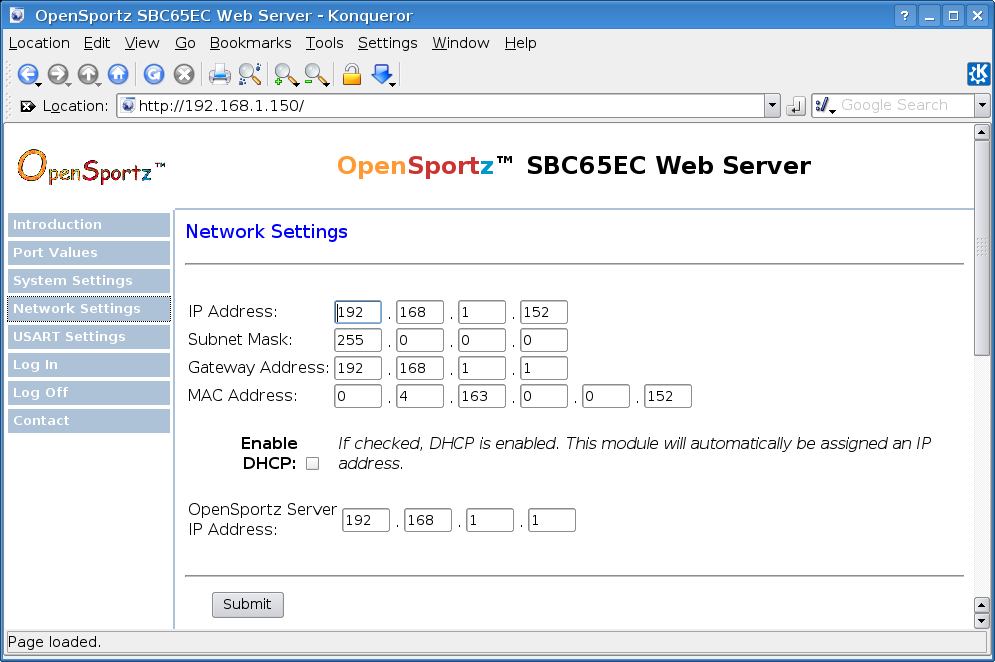
Device Setup |
top |
|
Devices are microcontroller units which form the interface between the server computer and the real world. The following types of devices are currently supported by OpenSportz:
Device Setup
Card Reader LED and Beeper. The card reader has a 2 colour LED and beeper used to indicate the status of the device. For door access card readers, the card reader is connected to the micro-controller unit which in turn is connected to the server over the ethernet network. For kiosk card readers, the card reader is connected to the micro-controller unit which is connected to the Kiosk PC via an RS-232 serial cable. The card reader and the micro-controller unit in combination form what is called a 'device' in OpenSportz.
Modtronix SBC65EC Configuration
| |
|
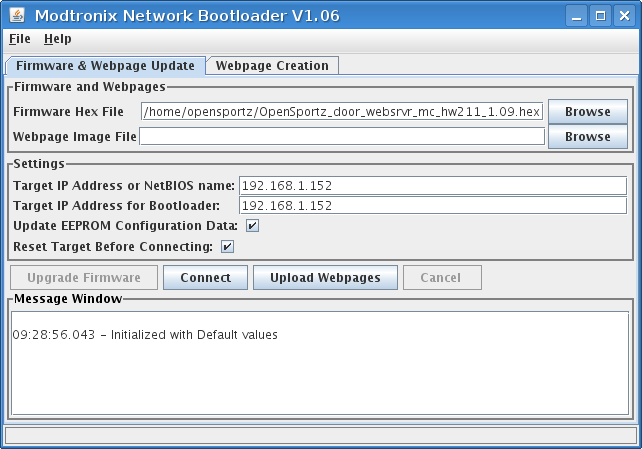
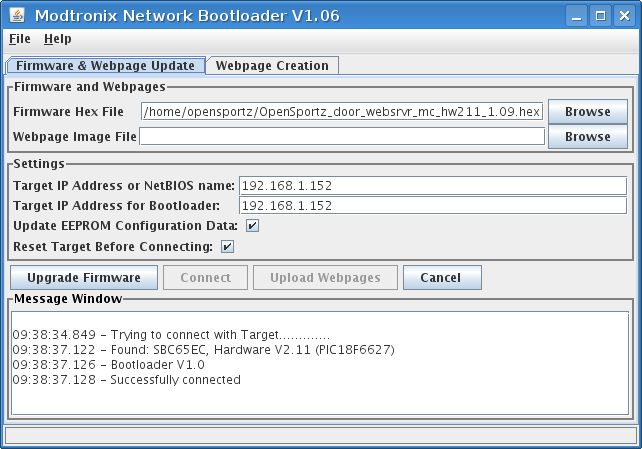
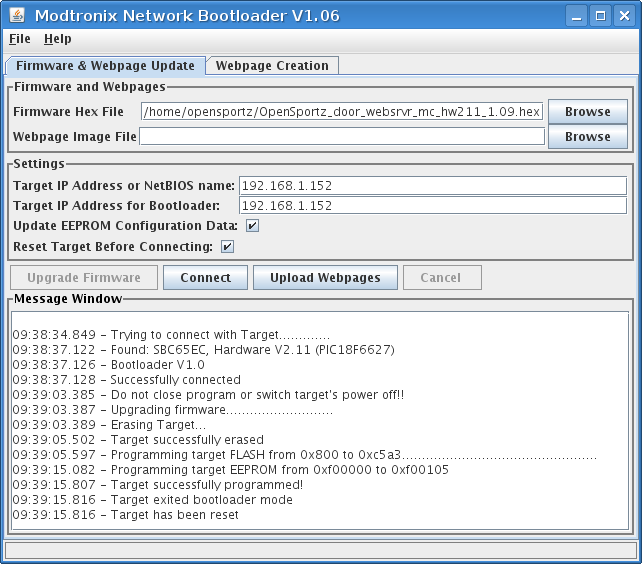
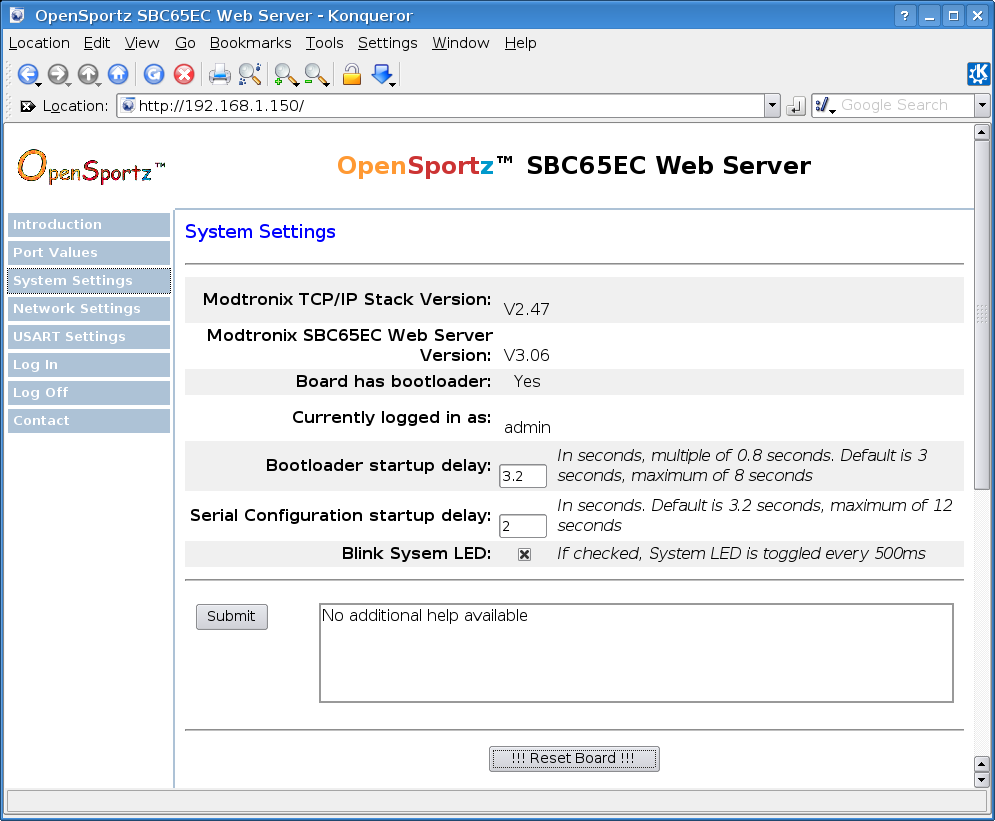
Device Firmware Upgrade |
top |
|
Upgrading the device firmware is done using the Modtronix Netloader software which is written in Java so it can run on Windows or Linux. The following steps are required when upgrading the device firmware:
|
|
|
Audit Log |
top |
|
The Audit Log records a summary of all database transactions made by all users of the system, including changes to user details, bookings and financial transactions. If something appears to be incorrect with any aspect of a users information you can review the history of all changes, this will show when the change was made and who made it. | |
|
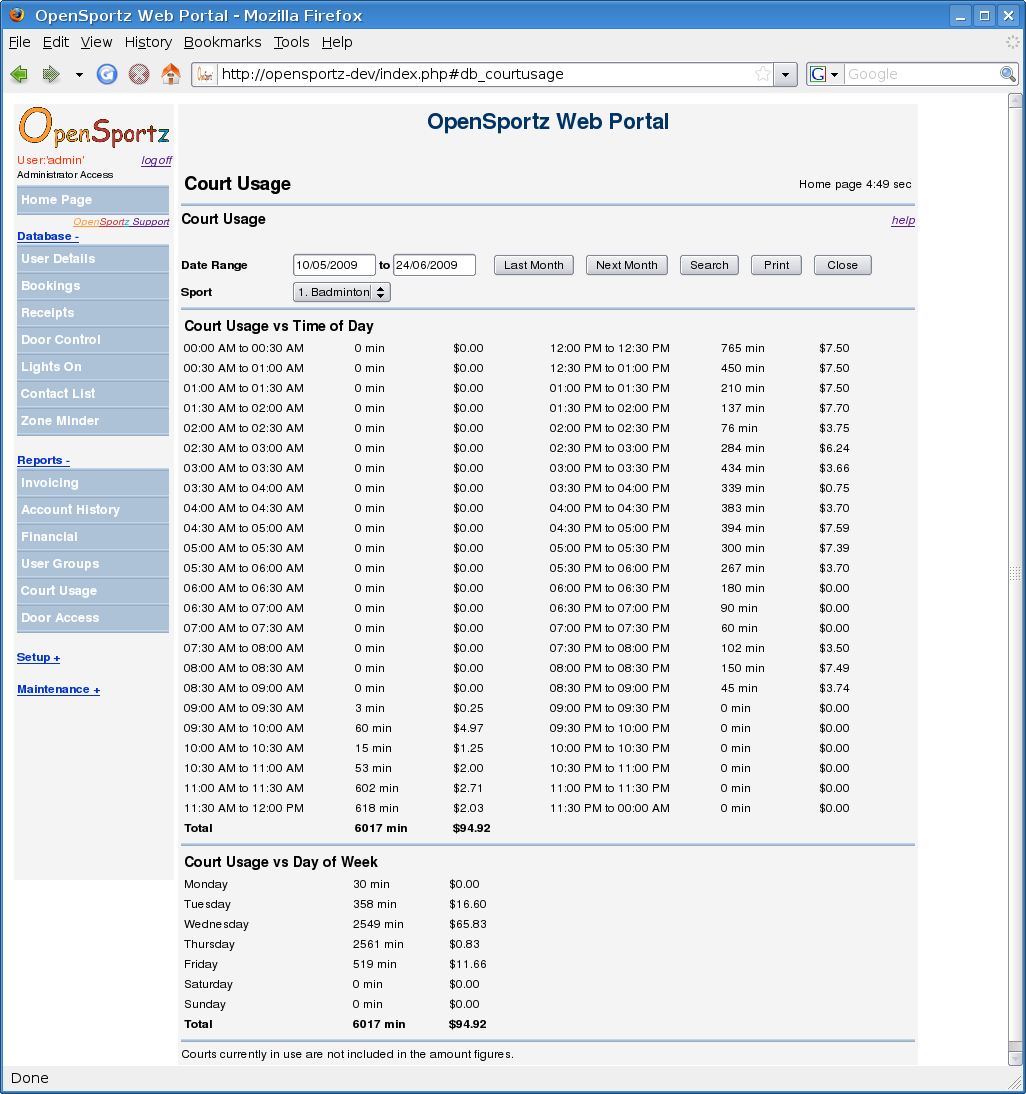
Court Usage Report |
top |
|
The Court Usage report provides details of how your courts are being used, from both a time of day and day of week perspective. You can also get a list of bookings which were cancelled by the system for one of the following reasons:
Usage details by court time and revenue are displayed for any selected date period. | |
|
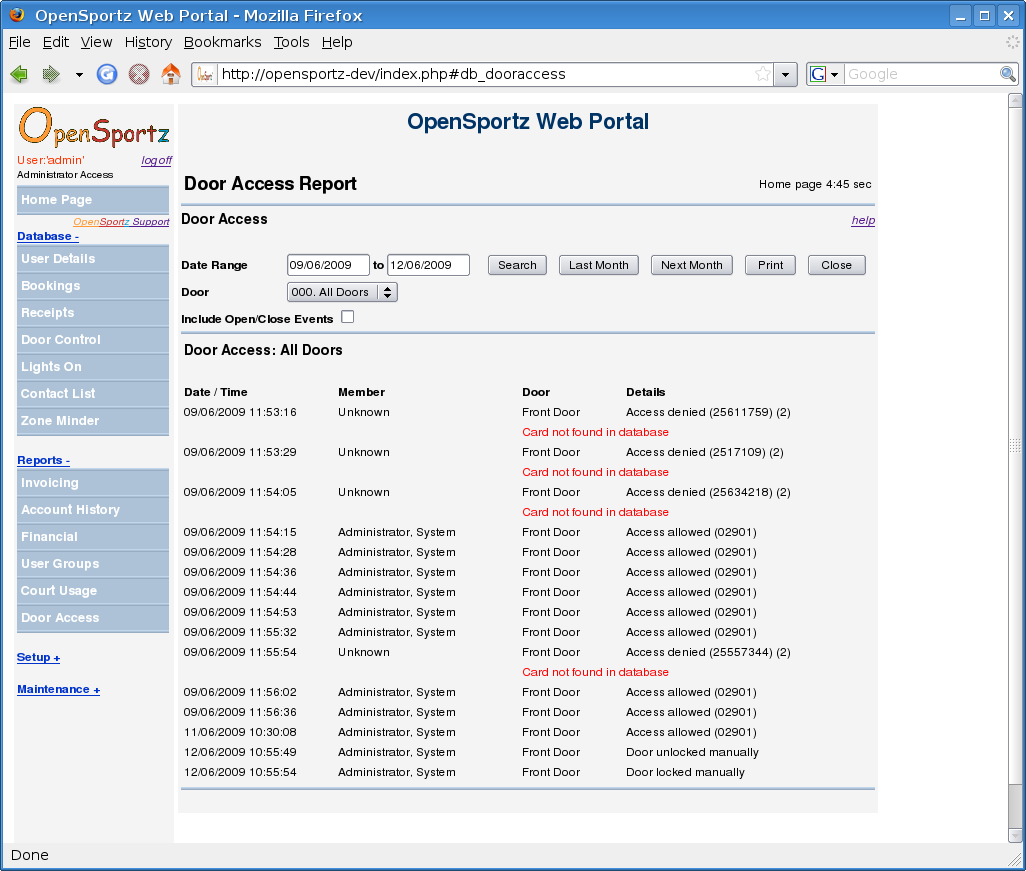
Door Access Report |
top |
|
The Door Access report provides details of when access controlled doors were opened and by who. If a controlled door is opened without a card, e.g. by forced entry, this will also be recorded. | |
|
Financial Report |
top |
|
The following financial reports are available: | |
|
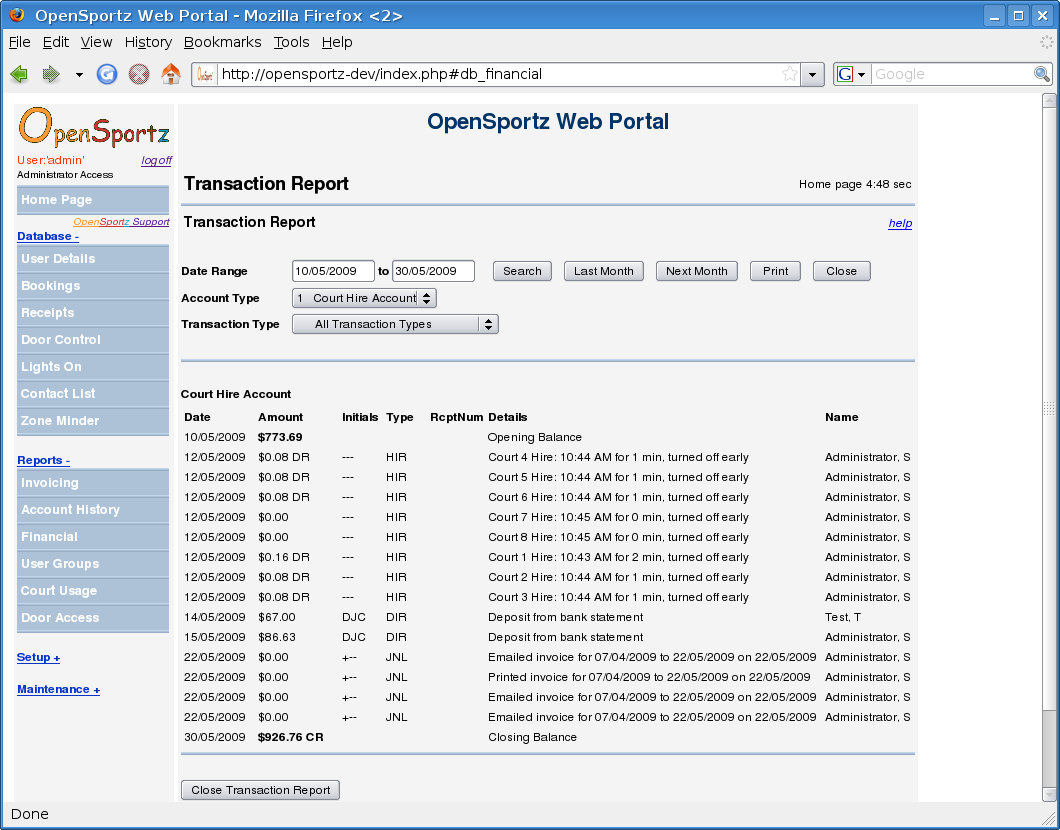
Transaction Report |
top |
|
The Transaction report shows all financial transactions for the selected date period, for all transaction types or for only the select transaction type (for example cash receipts only). By clicking the transaction date hyperlink you can view and change the details of any individual transaction - if you have the 'Accounts' or 'Admin' security access level. You can print the report or export it to a CSV file. | |
|
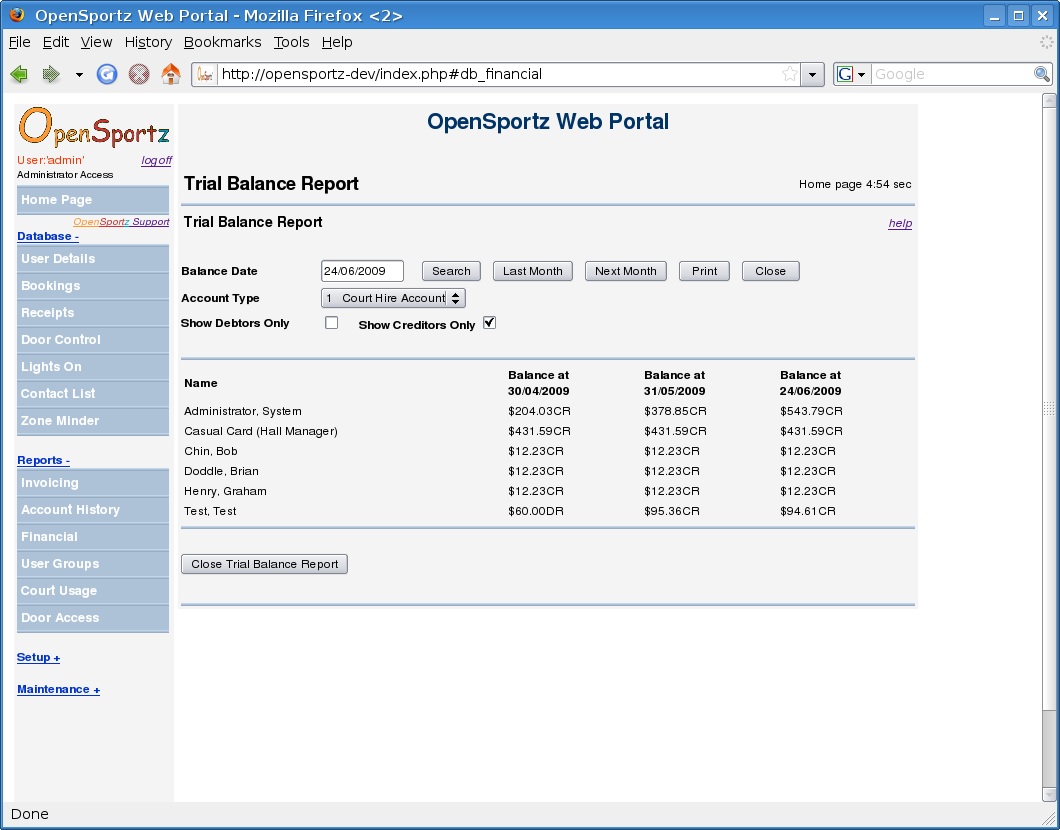
Trial Balance Report |
top |
|
The Trial Balance report displays a list of members/players with their account balance as at the selected date and the balance at the end of the previous two months. By default all players are displayed even if they have a zero balance. If you check Show Debtors Only then only players owing money will be displayed. If you check Show Creditors Only then only players with a credit balance will be displayed. You can print the report or export it to a CSV file. | |
|
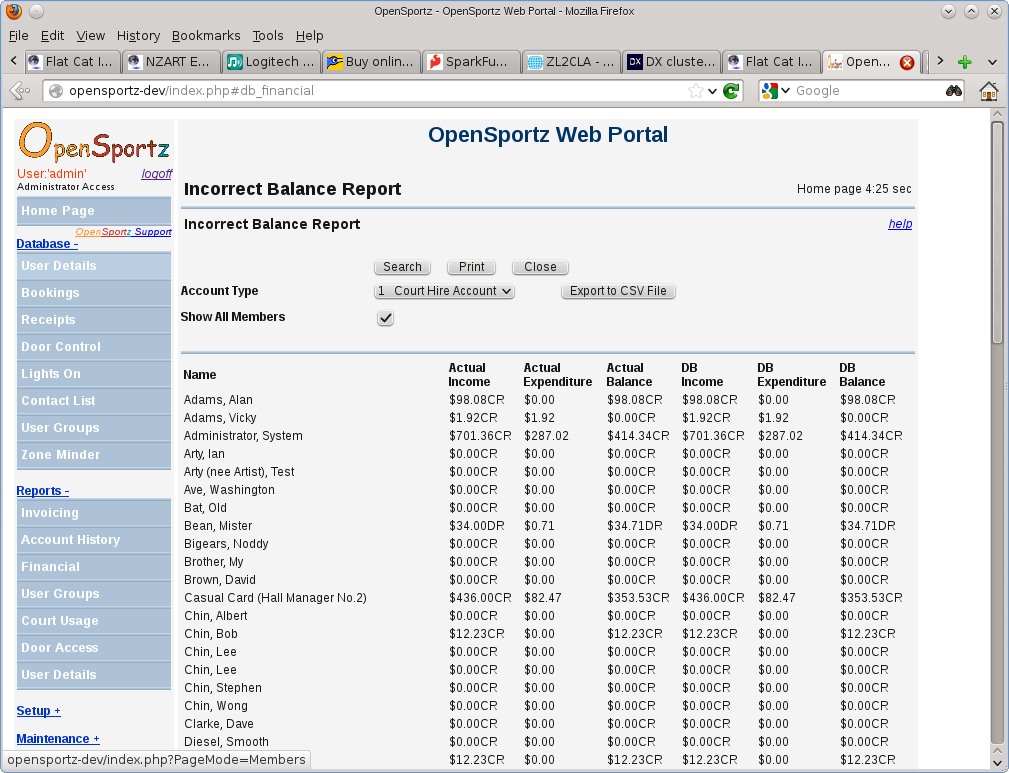
Incorrect Balance Report |
top |
|
The Incorrect Balance report checks all account balances to ensure the sum of the individual transaction in the database matches the balance record held in a separate table in the database. These 2 totals can be different if database corruption has occurred due to, for example, a power cut damaging the database or as a result of a software bug. You can manually correct any incorrect balances shown in the report from the selected members Account History page, and clicking the "Fix the Balance Record" button. You can print the report or export it to a CSV file. | |
|
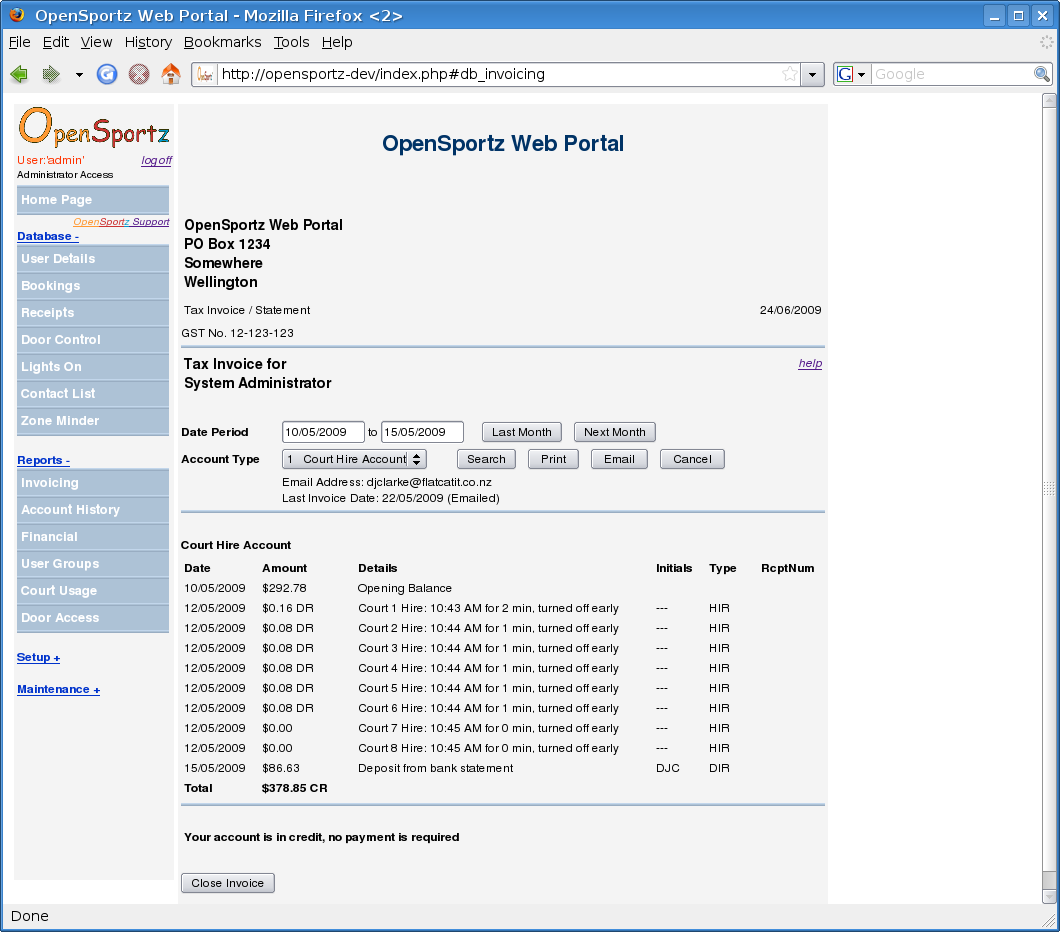
Invoicing |
top |
|
Invoicing allows you to display or print a GST Tax Invoice for any player for the selected date period. You can create invoices for any individual player simply by selecting their name and the date period. Alternatively you can email invoices in bulk. Bulk invoices are an easy way to bulk bill all players/groups operating a debit account simply by selecting the account type and date period. Once the list of accounts owing money is displayed on screen you can exclude individual accounts by clicking 'Process Invoice' link. A copy of each emailed invoice can be sent to your accounts email address if required. You can also print or display your clubs logo at the top right of the invoice, simply define the image file name in the site_config.php file. | |
|
Door Control |
top |
|
The Door Control page allows you to manually lock or unlock any of the access controlled doors on the system. If a door has been manually unlocked and the automatic door lock time is reached the door will be locked for security reasons. For ease of entry there is also an 'Unlock Door for 5 Seconds' button to make it easy to let someone in while keeping the facility secure. | |
|
Lights On / Off |
top |
|
The Lights On / Off page allows you to quickly turn court lights on or off without having to make a booking first. Before turning the lights on you must first select the user account to be charged the court hire. | |
|
Import Data |
top |
|
The Import Data feature allows you to import user details in bulk from a text file. The field data in the text file must be TAB or comma delimited and data may (or may not) be quoted. If required, some lines in the text file can be commented out (by starting the line with '#' or '//'), for example, the first line may contain column titles and not actual data. The following data fields can be imported for each user:
The import is done in 2 steps, first the text file is uploaded to the server and the data is checked and displayed on the screen for checking. If the data format appears to be correct you then click the 'Import Data' button to add the records to the database. If there is something wrong with the displayed data you should corrcet the original data in the text file and repeat the upload/checking step - otherwise you may have a lot of user records to correct manually. | |
|
System Status |
top |
|
The System Status page allows access to various information about the current operation of your OpenSportz server. The following information is currently provided: | |
|
Server Status |
top |
|
The Server Status page shows various details about the current performance of your OpenSportz server. The following information is currently provided:
The most important parameters from the above information are as follows:
In addition to the above information there are 2 important log files containing important information:
| |
|
OpenSportz Status |
top |
|
The OpenSportz Status page shows the latest log file produced by the osz-ethernet.php script which interfaces to the door access controllers and lighting controller. The following message types are sent between the server and control units:
For all messages, the first parameter is the control unit device index (or 4th digit of the device's IP address). A 2 byte checksum is included in each message to detect any data errors - this appears after the '*' character at the end of the message. Here is an example of a typical message: $SET,152,01,040*6D. | |
|
Kiosk Information |
top |
|
This text can be viewed on the bookings kiosk by touching/clicking the "Information" button on the left hand side menu. The first line of each information category will be displayed on the main 'Information' display as a title so the user can see which page of information they want to view more of. When entering the information text from the 'Database' setup menu you should not include 'Tab' characters as these will be replaced by a single space for formatting reasons when the information is saved. There are 4 categories of general information available, such as committee contact details, shop opening hours, etc. Each of the 4 categories of information can be one or more pages in length, the user can touch the 'Scroll Up' or 'Scroll Down' buttons on the kiosk to view the entire document. The Contact List is also available on the kiosk but will only be displayed after the user has swiped their card. | |
|
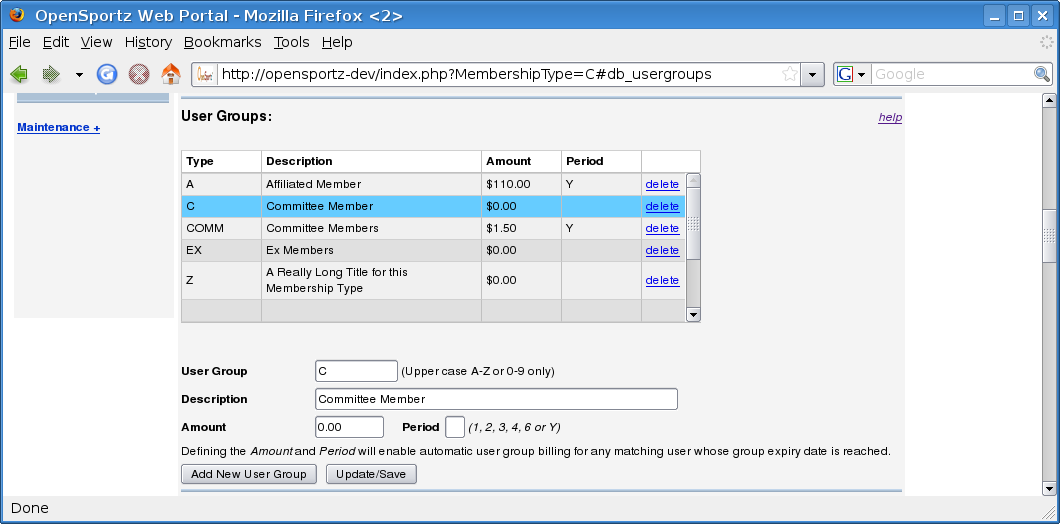
User Groups |
top |
|
User groups are a way of arbitrarily grouping your users for reporting or billing purposes. For example, if you create a user group of 'J - Junior Members', you can then automatically display or print a report of all users assigned to this group. Each user group record allows you to record an expiry date and a comment, at least one of these fields must be entered. You can also add the user group amount and billing frequency (1, 2, 3, 4 or 6 months or Y for yearly). To delete a user group record from an individual user, click the 'Del' checkbox, then save the record. | |
|
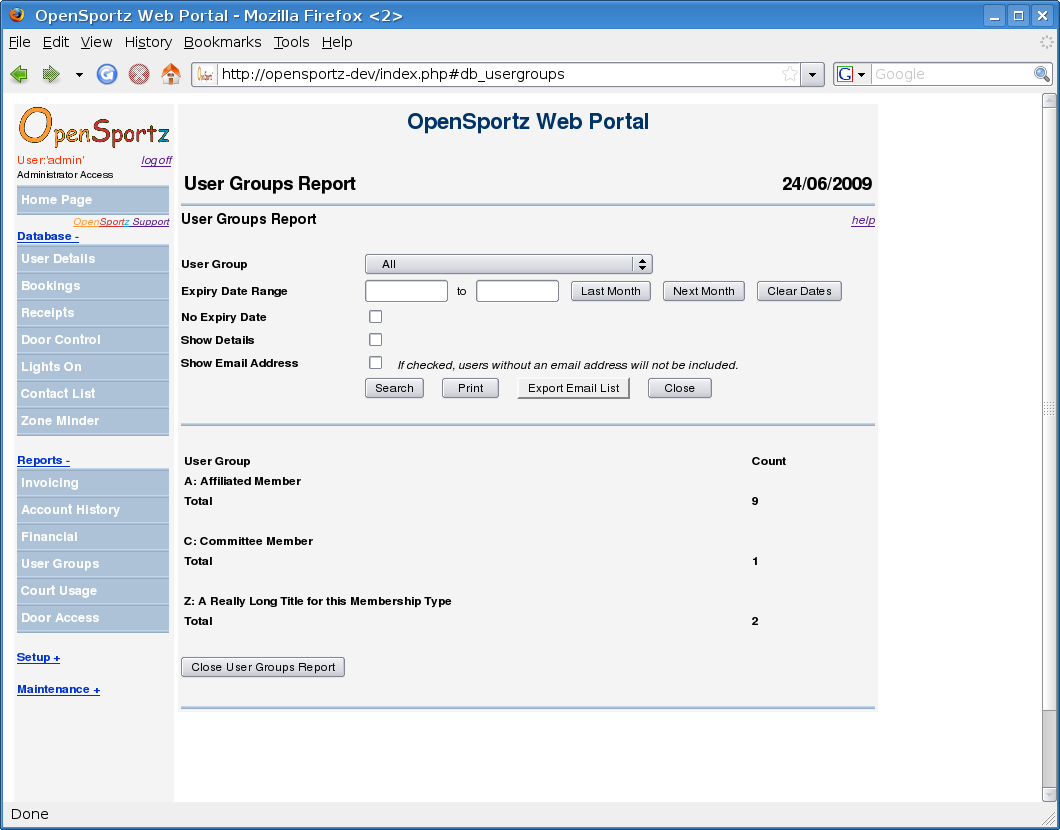
User Groups Report |
top |
|
The User Groups Report allows you to display or print information on the makeup of your member/player types. You can generate a report listing individual players or just the total number of players in selected user groups. You can also choose to print or download an email address list for all users or a particular muser group. You can then import this list (name and email address in text CSV format) into the email program of your choice to make emailing your users easier. You can use the user groups report to check for players who are missing a user group expiry date by checking the appropriate box. The will help to ensure players are not missed when using the automatic user group billing features of OpenSportz. | |
|
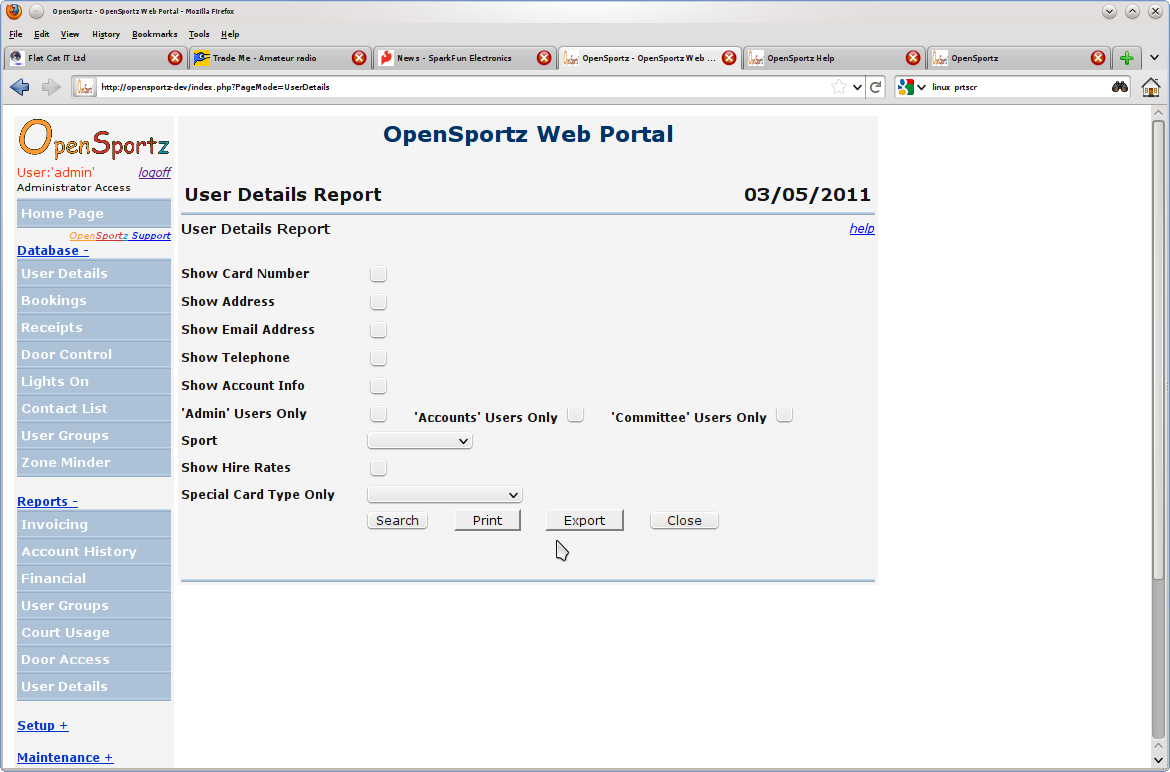
User Details Report |
top |
|
The User Details Report allows you to display or print information on your users such as name, address, card number and email address. You can also choose to print or export the list in CSV format. | |
|
Contact List |
top |
|
The Contact List allows players to choose that some, none or all of their contact details are visible to other club players either at the club on the bookings kiosk, or over the internet (after the user has logged on). This should make it easier for players to arrange matches between themselves. Also included on the contact list is each players grade, code and grading points value. | |
|
Card Details |
top |
|
Each sport allows individual control of the folloing lighting/booking parameters for each player: Enabled: This checkbox enables or disables lighting and bookings for this sport. Debt Limit: This allows the card to operate as a credit card (e.g. for club and coaches set it to $500.00) or a debit card (for individual players set it to $0.00). Multi Courts: Check this to allow this card to book multiple courts at the same time, normally this is only allocated to clubs or coaches, not individual players. Book All Courts: Check this to force this user to always book all courts, i.e. the entire hall or facility. This option would be used, for example, to lease out your Badminton stadium for the Trampoline club who use the entire facility. Manager Card: This feature allows this card to turn on or off other players lights and cancel bookings. Special Card Types is a feature which allows these cards to have automatic actions or triggers applied. The following Special Card Types are available.
Default No. of Periods: If your standard court periods are 30 minutes, setting this to 1 means the default court booking will be 30 minutes, 2 means 60 minutes, etc. Auto Lights On for Bookings: This means that once the court is booked the lights will automatically turn on regardless of whether the player turns up to play. Normally used for club or event cards. Charge Category: Sets how much this player is charged for booking a court. Playing Times: Sets when this player may book a court. Two Cards Reqired: If checked this player can book a court with their own card but cannot turn the lights on without a second card or choosing the visitor or practice option. Visitor Count: How many visitor sessions are available to this player. Practice Count: How many practice sessions are available to this player. Visitor Charge: How much extra is charged when a visitor session is used, on top of half the normal court hire charge, in $ per hour. Practice Charge: How much extra is charged when a practice session is used, on top of half the normal court hire charge, in $ per hour. Door Open for Bookings: This option allows the door to be automatically unlocked for the duration of the booking. The following option are available:
| |
|
Door Access Info |
top |
|
Each access controlled door has a default valid time category assigned when the control unit configured from the Device Setup page. This specifies either the default access allowed period (e.g. 'Hall Open Time'), or you can choose that access is disabled by default. If access is allowed by default then all users with a valid card will be able to gain access during the default access allowed period. You can alter the access for individual users if required from the user details page. If access is disabled by default then no users can gain access until their individual door access is configured from their user details page. The user details page allows door access to be configured on an individual user basis, either by simply selecting the desired valid time category or choose 'Access Not Permitted' to disable access. Optionally you can grant access only for a specified date/time period. This may be useful for a bar duty roster, for example. | |
|
Bank Statement Import |
top |
|
This feature allows you to import a bank statement in text CSV format into OpenSportz and process all the credits against each players court hire account. The last number in the comment field of the bank statement is expected to be the players card number - when making the direct credit the player must put their cadr number in the Reference field. A 'CSV' file is a text file with Comma Separated Values. | |
|
Backup |
top |
|
Database Backups can be performed from a command shell on the server with the following command: The opensportz_user_name and opensportz_db_name information is in the file /srv/www/htdocs/opensportz/site_config.php which was setup during the OpenSportz installation. The above command should be run periodically (e.g. every day by cron) to take a backup of your data. This can be done by setting up a cron job running as the superuser 'root' as shown below.
> sudo crontab -e The above crontab file will execute the named script at 4:09pm every day. The following shows an example of the backup script using the mysqldump command shown above.
>sudo vi /usr/local/bin/opensportz-backup.sh | |